I will admit up front, there is a bit of imposter syndrome that comes with posting this, as I do not consider myself an expert in using git by any means.
If you’re a developer then git has become a fundamental skill that you can’t live without. If you’re like me and you don’t work in a development role, then you probably know what git is and you may have a repo, but you might not use it consistently enough to become familiar with it.
This article is going to go over how it works on a very basic level and how I use it day to day. This will stay super simple, with a goal of presenting git in an introductory way that I’ve used to build confidence with it.
Introduction #
I’m going to assume you know what git is and already have it installed, if not there are plenty of courses available with instructions that go over this. (Like w3schools, or Microsoft Learning, or free code camp, etc.)
Instead, I’m going to talk a little bit about how a git directory works once it’s been initialized on your local computer, and then go over the basic commands you can use to get in the habit of working with it.
Local Repo - Directory and Files #
When you clone or initialize a repository on your local PC, git creates a (hidden) directory named ‘.git’ at the current location that it uses to track your changes to the repository. You don’t need to look at this directory but it does indicate the root of a repository and is how the git command recognizes and connects the local repository to the remote one.
In addition to the .git folder, you may notice a couple additional elements:
-
.github folder
This is a folder that can be populated by a number of things related to your github project such as workflows, templates, or other features.
Generally, you can ignore this folder unless you have a reason to use it. (For example, this folder was created automatically for me when Azure Static Web Apps configured my github actions, see my post about getting this blog online.)
-
.gitignore file
This file specifies local files that you don’t want git to push to your remote repository. This file can be useful for a number of scenarios. For example:
I once used this to prevent git from saving a file I was using to store secrets/keys I used in my local dev environment. Long term these would be stored in github secrets but during development it was an easy way to keep them from being stored publicly.
I’ve used this multiple times to exclude “example” sites that were included in a template repository I cloned. In these cases, the template came with a fully built demo site you could see and interact with. I didn’t want to store this entire example in my project files, so I added its directory to the .gitignore file.
My setup and workflow #
I have two primary repos that I maintain. One is a public Powershell repo with scripts that I’ve developed for work that I think could be useful to others. The second is a private repo I use to store the files for this site.
I regularly work across four different computers; I have my desktop PC, my Surface, my work laptop, and my work WVD. The powershell repo I might update from any of these four devices, and for my blog I regularly switch between the desktop and my Surface. My github “workflow” is basically used to make sure my remote repos are up to date so I can work on my files locally, regardless of which device I’m on.
As I mentioned earlier, I also have a github action configured for my blog that automatically updates my public site and is triggered on any changes to the main branch. Because of this, I maintain one extra branch in my project that I use to work on drafts. Once I’m ready to post, I merge this branch with main to update the site. This prevents the action from constantly firing as I’m drafting and editing posts or making other modifications to the site.
This gives me a very basic process I use on a daily basis that has helped me become more familiar with using git.
Git commands I use #
Except for the commands where I discuss changing branches, I am just going display the following commands referencing the main branch. Any time you see main, know that you should substitute it for whichever branch you’re working on.
Git Pull - Before you begin working #
When I first sit down on my computer I use the following:
git pull origin main
This command reaches out to your remote repo and pulls down any changes that don’t exist locally.
git pull- This command tells it to reach out and pull changes from a remote repoorigin- Is the repo you are pulling from, it references the original repository that you synced the local directory from. “Origin” is a default alias that is automatically configured on your system to reference that repository.main- Is the branch you are currently working in and pulling from. This is the part of the command that is mostly likely to be changed
It’s important to know that main is the default name for the primary branch in a github repo. You can create new branches named however you like.
Git Add / Git Commit / Git Push - When you are finished working for now #
There are three commands you run in sequence when you want to save any changes you have made locally and push them to your remote repo:
git add .
git commit -m "My commit message"
git push origin main
These commands each do something slightly different, but for simple use cases like mine are basically always ran together.
git add .- Stages any new or changed files so they will be pushed up with your next commit. The.afteraddtells it to add all files that are new or changed. You can list independent files instead if you like, that would look likegit add my-text-file.txt my-second-text-file.txt. Or to add an entire directory it would begit add directory/(where the name of the folder is ‘directory’).git commit -m "my message"- Packages everything you staged in the prior command, and then applies the commit message to every file you’ve staged. If you look at any file in your git repo, there is a commit message that was associated with it when it was last updated in the repo.git push origin main- This has all the same elements as our git pull command above, but pushing to the remote repo instead.
If you are done working for the time being, or if you are switching computers to work elsewhere, you need to get in the habit of running these commands. I have definitely sat down on my desktop and then realized I never pushed the changes from my Surface, requiring me to go find it and push my changes before I could continue working.
Git Status - Shows your current changes #
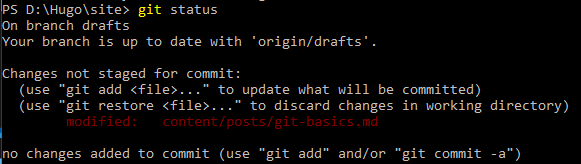
If you ever need to know which branch you are currently on or which files are staged or need to be added via git add, you can use the following command:
git status
This will display your current branch, along with files that have been modified and are either staged for a commit or need to be added. In the picture below, you can see that I’m in my drafts branch, and I’ve edited this current post so it needs to be added before I commit:
Git Checkout - Create and switch branches #
This might not be the best method, but to keep things simple for myself I use this command to create and switch between branches:
git checkout <-b> [branch-name]
I’ve tried to avoid using commands up to this point with variable elements but I can’t avoid it in this case.
git checkout- This is the basic command to switch to another branch<-b>(optional) - When creating a new branch that doesn’t exist you can use the -b parameter to create the new branch and switch to it[branch-name](required) - The name of the branch you are switching to. To switch to a branch that already exists it would look likegit checkout my-branch, or to switch back to the main branch it would begit checkout main
To further reiterate the difference, if I wanted to create a new branch called ’new-branch’ and switch to it, I can run git checkout -b new-branch which creates and switches to the new branch because of the -b parameter. If I wanted to then switch back to the main branch it would be git checkout main.
I’ve never had a use case where I need to create a branch and not switch to it, which is why I lump these together.
Git Merge - Combine your branches #
Like I mentioned earlier, I draft my posts in a ‘drafts’ branch and then when I am ready to publish them I commit those changes to the main one.
git checkout main
git merge [branch-name]
This is a two step process:
git checkout main- As we know from above, this changes your current working branch to maingit merge [branch-name]- This takes all the changes from the target branch and merges them into your current branch (whichever branch you checked out in the previous step)
As an example of the above, when I am ready to merge the changes from my drafts branch into main, I use the following:
git checkout main # switches to main branch
git merge drafts # pull the changes from the drafts branch into main
Putting it in Practice #
Taking each of the commands above, here is what a sample workflow would look like for me as I work on this site:
-
As I’m getting started, I open VS Code. I know I was working on a post, but I can’t remember which branch my current computer is in, so I run
git statusto see my current branch. -
Let’s say that shows I’m in my main branch, my recent work is in the drafts branch so I need to switch using
git checkout drafts -
Now that I know my current environment is in the correct branch, I want to pull any changes I might have made from the other device with
git pull origin drafts -
Lets assume now that I finished the post I was working on. First I want to run my commands to save to my github repo:
-
git add .to stage the files I’ve edited -
git commit -m "finished my-post.md file"to commit the changes with a message about what I was working on -
git push origin draftsto push those changes to my remote repository.
-
-
Now that those changes are committed and pushed, to publish the post I want to switch to the main branch and merge my changes from drafts:
-
git checkout mainto switch to the main branch -
git merge draftsto bring the changes I made to the drafts branch into the main branch. Recall from earlier, changes to my main branch automatically trigger my github workflow that now publishes my new post to my site.
-
It may also be worth mentioning, that when you merge a branch into another like we are doing in the final step, the branch you are merging from (in this case drafts) is not deleted. This works for my use case because I continue to use drafts for new posts, but if you wanted to remove that branch after you merge it you would need to use git branch -d [branch-name] to delete it locally and git push origin :[branch-name] to remove the remote copy (note the “:” preceding the branch name).
Conclusion #
If you were only concerned about keeping files synced and available across multiple devices, there are simpler solutions available like OneDrive to serve that purpose. However, any cloud workflow or team development effort is centered around git because of the great tooling you get around managing a code base or even just text files. I strongly believe that avoiding git would be costing yourself a very beneficial career skill and forcing yourself to learn it can only pay dividends in that regard.
I’ve built a routine that fits around how I work in order to force myself to use it. Like anything, the more I’ve used it the more comfortable I’ve gotten and the more I’ve learned to understand it. I feel like git can become something overly complicated in documentation and stack overflow, so hopefully this simplified it in a way that can be easily reproduced and assist someone else in learning it.