This post will cover the basics of setting up an Azure Queue and using APIs to interact with it. I will go over how to create a queue, how to generate a Shared Access Signature to authenticate for API calls, and how to configure a function app to pull messages from the queue.
I was exploring the service to see if I could use it to display a list of current running jobs. As I began working with it I quickly found that it wouldn’t be well suited for that purpose. I’ll go over that in more detail in the conclusion.
Step 1 - Create the Queue #
An Azure Queue is essentially just a table that stores text “messages” up to 64KB in size. The only requirement for creating one is that you must have a Storage account to store this table in.
If you don’t already have one, create a resource group and then create a storage account. For the storage account, I chose local redundant storage as the cheapest option and didn’t customize any settings beyond that. (Obviously for a production workload I would have some sort of redundant storage.)
Once the storage account has been created, navigate to the Queues blade (under Data storage) and click the button to create a new Queue:
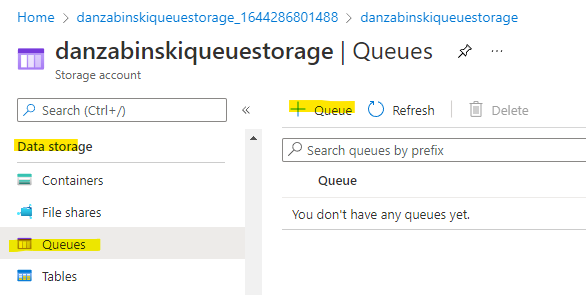
You only need to specify a name for the queue and you’re up and running.
Step 2 - Create the Shared Access Signature for API calls #
From your storage account (not the queue itself), click on Shared Access Signature under the Security + Networking section of the menu. From here you can specify the access this SAS will need.
As a side note, it’s generally not recommended to use a Shared Access Signature for any production workload. These are an easy way to get the access you need to test functionality, but Azure recommends that you use either an Azure AD account for authentication (preferred) or a Shared Key (less preferred, but still better then an SAS).
Fill out the form to create the Shared Access Signature:
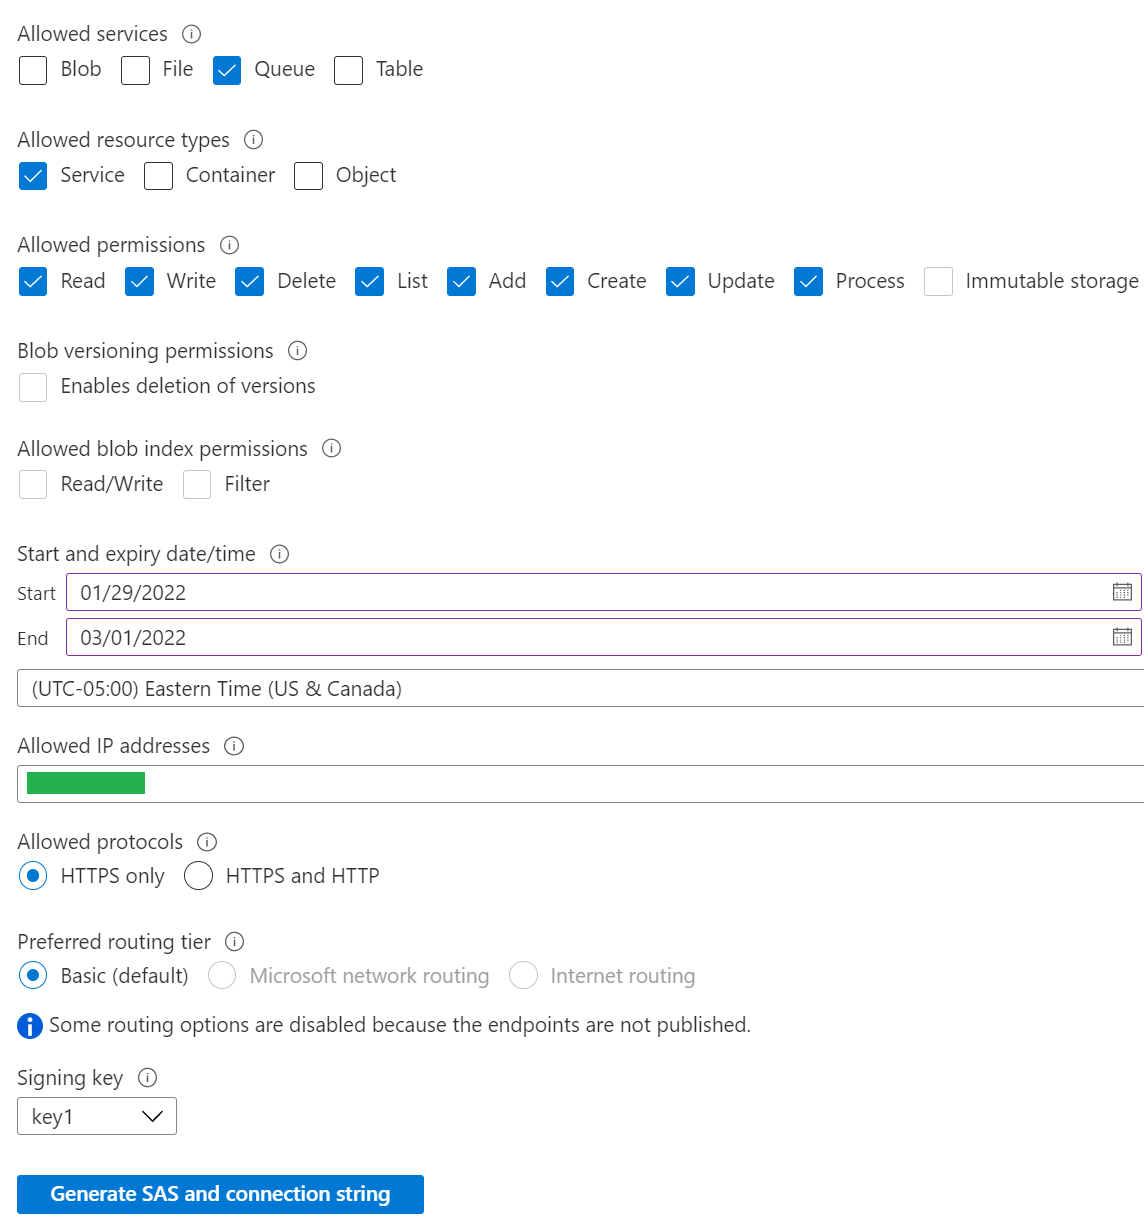
There are a couple of things I want to point out about the sample image above:
-
Even though this is test and I’m already using a less secure method of authentication, I still prefer to restrict permissions as much as possible. This is why I only allow permissions to the Queue service, I specify my home IP address, and I set an expiration date.
-
The Allowed Resource Type section is a little counter-intuitive. I didn’t really understand what this was asking and in my mind I thought “Queue’s are a service, therefore I’ll just choose service” but I actually had to come back and change this later.
This is actually asking what sort of things your API will be allowed to interact with. With the permissions set as pictured, I was able to list the available Queues because that action only required Read permissions to the Queue Service. However, I wasn’t able to create new Queue messages, because the messages themselves are Objects. So I had to come back and include Objects as an allowed resource in my SAS.
This was a little confusing to me but makes more sense after running into permissions issues later. I figured the example above is a good illustration of some of the nuances of this section.
Once you have the settings specified you can generate the SAS and copy it to a text file for reference later.
Step 3 - Create a Function App to Read Queue Messages #
Navigate back to the resource group that contains your storage account and create a new Function App. As a basic setup do the following:
-
Choose to publish the app as Code and choose the language you’re most familiar with. In my case this is Powershell.
-
Click on the Hosting tab and select the storage account you are already using to host your queue. This is not required, but I prefer to have minimal resources so I’d rather use what’s already existing vs create something new with a generic name.
-
Click on the Monitoring tab and choose No for Application Insights. It’s not really necessary for a test instance.
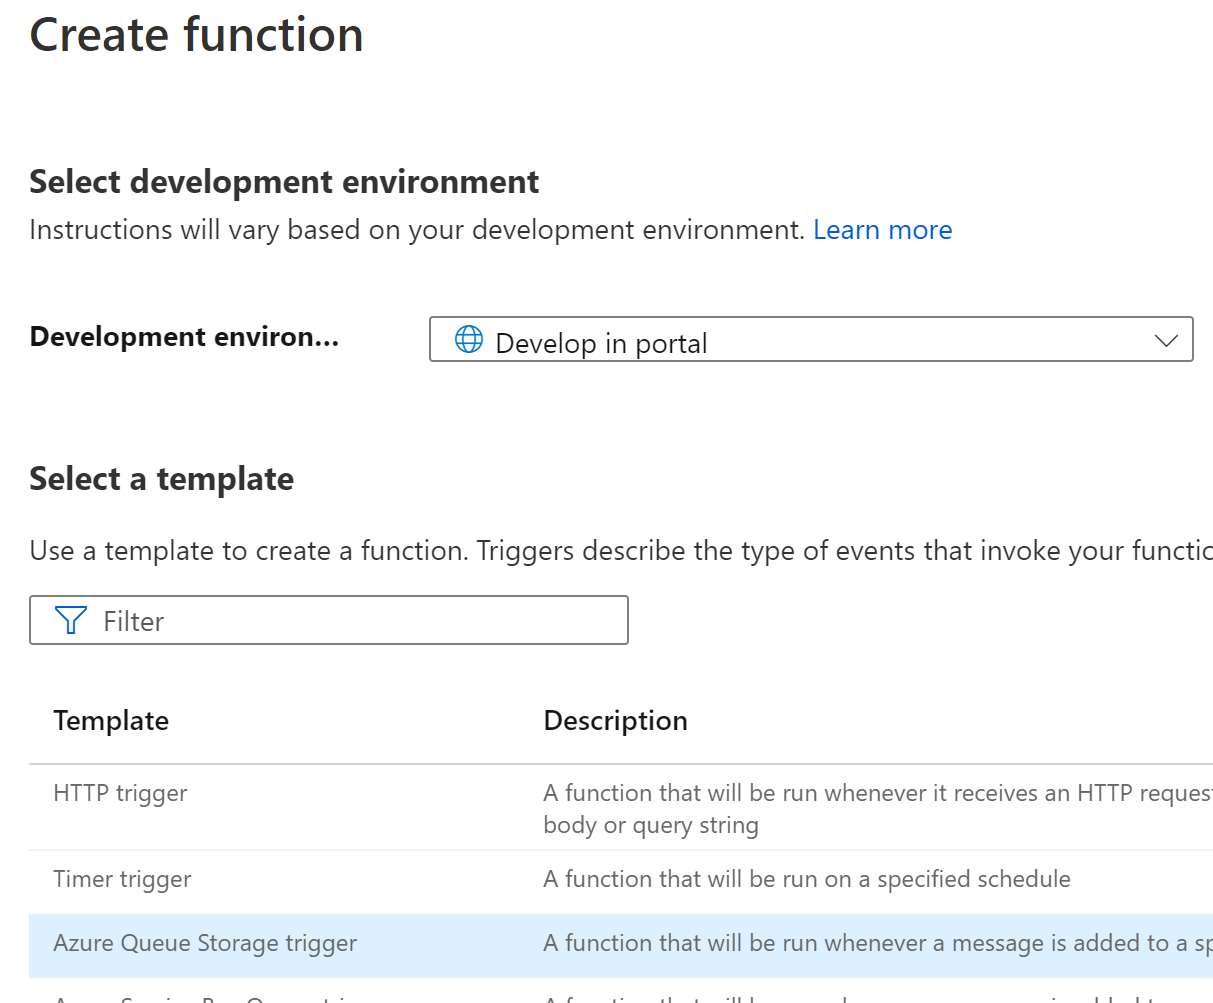
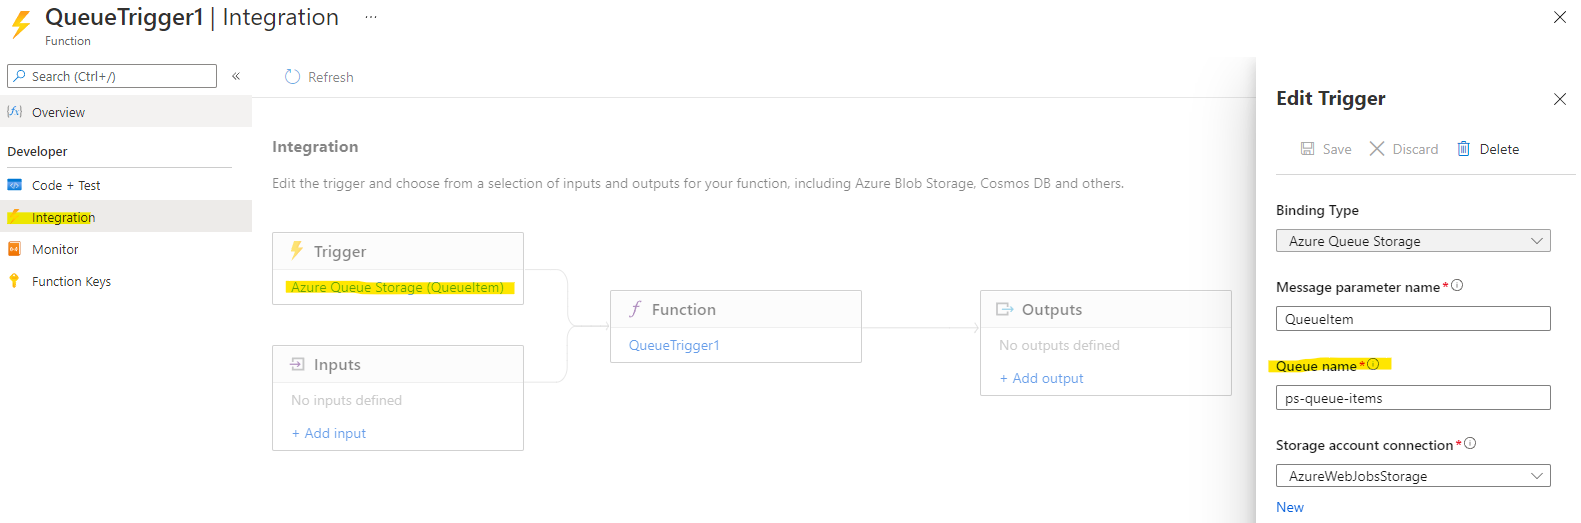
Once the Function app appears in your resources group, open it and select Functions under the Functions section of the app. From here you can create a new function.
As a template, choose Azure Queue Storage trigger. This will automatically configure the function to be triggered by a new message being added to a queue:
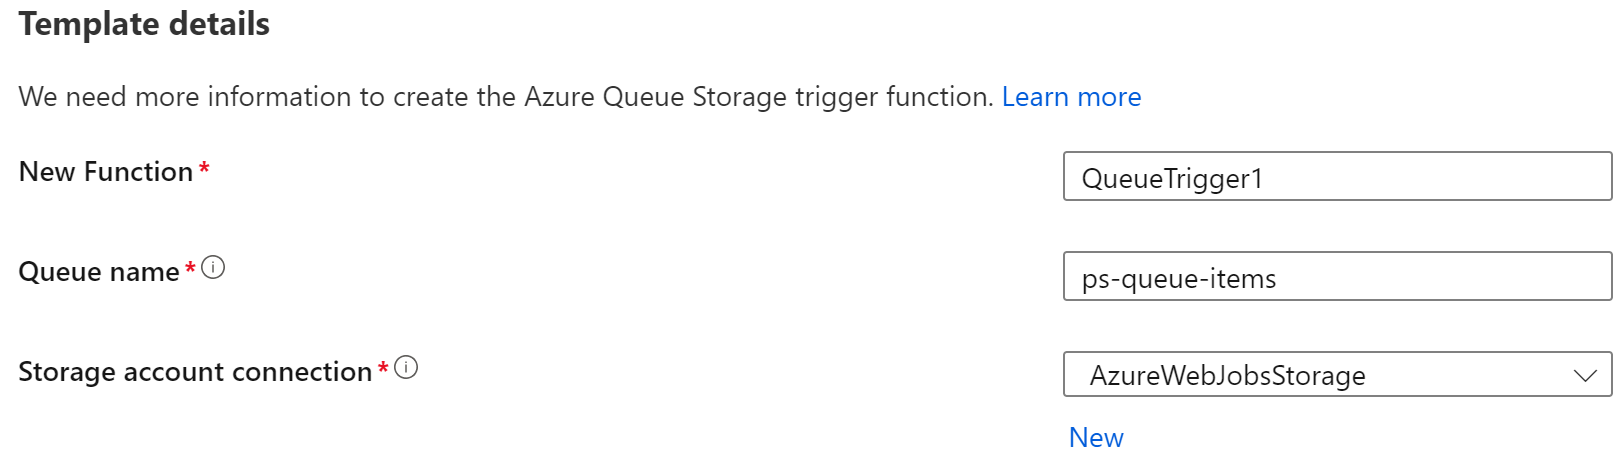
In the next menu, name your function however you’d like in the New Function field. The Queue name field should be set to the name of the queue you want your function to pull messages from (if you don’t remember the name of your queue you can edit this easily later). Leave the Storage account connection field as the default “AzureWebJobsStorage” value, this value is automatically populated under the Configuration settings of the function app.
You will automatically be redirected to the new function when it’s created. The layout of the function is pretty simple, to reconfigure the queue that the function triggers from select the Integration menu on the left and click the Azure Queue Storage trigger to edit the values. The Queue name field indicates the name of the queue this function is tied to.
The Code + Test section on the left allows you to edit the code in the function. Because I’m not actually doing anything with this function I left mine as default. It comes pre-populated with the variables that will contain the message data so you can reference them easily if you wanted to customize them.
Step 4 - Use Your SAS and API Calls to Interact with the Queue #
Shout out to the Insomnia API client here as the tool I use to test APIs.
As a basic breakdown of the API structure, you have your method and then your URL that is constructed as:
[http/https]://[domain]/[url components]?[query values]
Using your SAS and the Azure Queue API reference you would specify those components as:
-
Domain - The domain (and URL) can be found by going to your Storage account > Queue and you will see your queues and their associated URLs listed.
-
URL Components - This is specified both as part of the domain AND the API reference. It would look like ‘mystorage.queue.core.windows.net/my-queue/messages’.
-
Query Values - The query portion is anything after the ? which is at the end of the URL. This is where you add your SAS from Step 2. A SAS is basically a predefined list of query values which consist of “parameter=value” separated by ampersands (&). For example “parameter1=value1¶meter2=value2¶meter3=value3”.
This is good to know only because the API reference might include parameters you need to add to the query section. These can be added before or after your SAS string in the URL. For example the Peek Message API call is ‘domain/queue/messages?peekonly=true’ so using the same URL example as above this would look like ‘mystorage.queue.core.windows.net/my-queue/messages?peekonly=true&[your SAS string]’.
Once you understand that, it’s pretty simple to use the API reference to build the calls you need to interact with your storage.
Here are a few examples:
List Queue #
The List Queue call displays all the queues within a storage account - GET https://mystorageaccount.queue.core.windows.net/?[your SAS string]
Add Message to Queue #
To add a message to a Queue you would use Put Message which is a little more complicated because you need to add text form data as XML:
<QueueMessage>
    <MessageText>Test Message</MessageText>
</QueueMessage>
But once you have that it would be - POST https://mystorageaccount.queue.core.windows.net/myqueue/messages?[your SAS string]
Read the First Message From a Queue #
Using the Peek Message API you can read the first message from a queue without locking it - GET https://mystorageaccount.queue.core.windows.net/myqueue/messages?peekonly=true&[your SAS string]
Seeing It Work #
Assuming you specified the name of your queue correctly as the trigger in your function app, when you create a message in your Queue, either by API or by opening your Queue and manually creating a new message, you should see your function trigger. There is a slight delay but you can validate your function is processing the messages by looking at your queue (it should be empty) and by opening your function app and looking at the metrics:
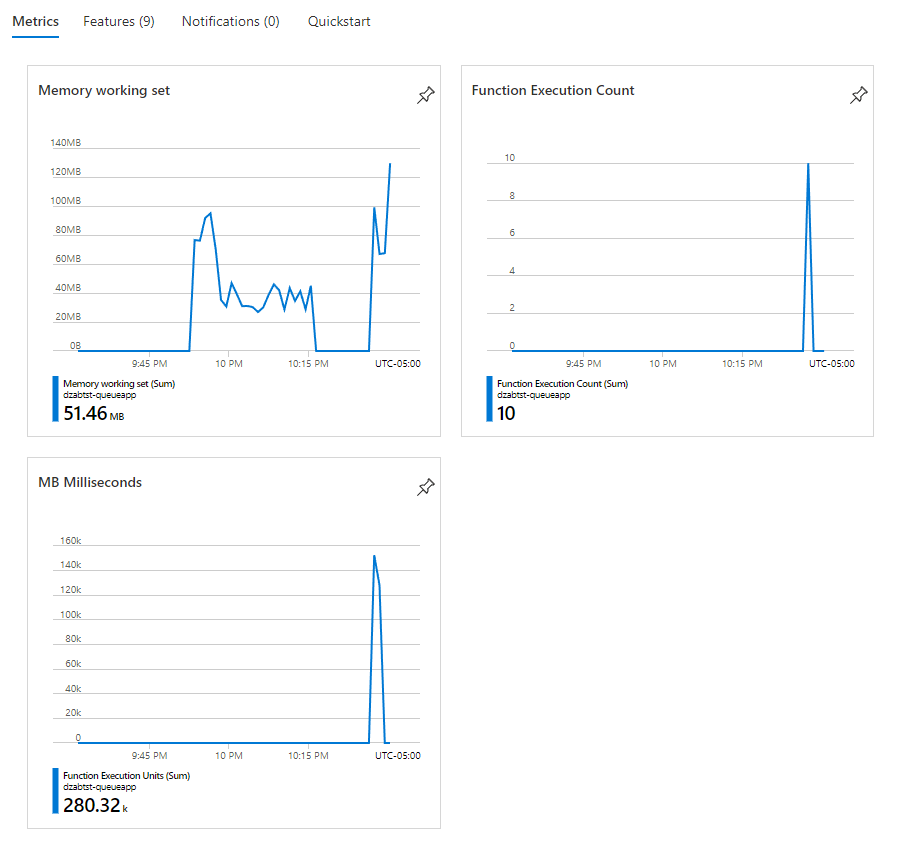
I’ll go into more detail in the next section, but you might notice a couple things about the metrics. First, each execution will likely be a failure. And second, you will probably see a second queue created for you automatically with -poison appended to the name.
I’m not really concerned about this because I wasn’t attempting to accomplish anything. I can tell the function is triggering correctly, so I know all my pieces are performing “as expected”.
Notes About Queues #
Message Invisibility #
I mentioned in the beginning that I was looking into potentially using Queues as a way to view a list of work in progress within an application. Queues would be a poor use case for this because of how they interact with the service(s) consuming messages from the queue.
In order to prevent work from being duplicated, when your backend service pulls a message from the queue and begins to process it, that messages disappears from the queue. Because queues are designed to have multiple workers processing the messages, this is important to prevent two workers from working on the same item.
Unfortunately for my use case, this makes it impossible to see which messages are being processed because the ones being worked on are invisible. Not that big of a deal, there are other ways for me to log and monitor that.
Message Formatting for Azure Functions #
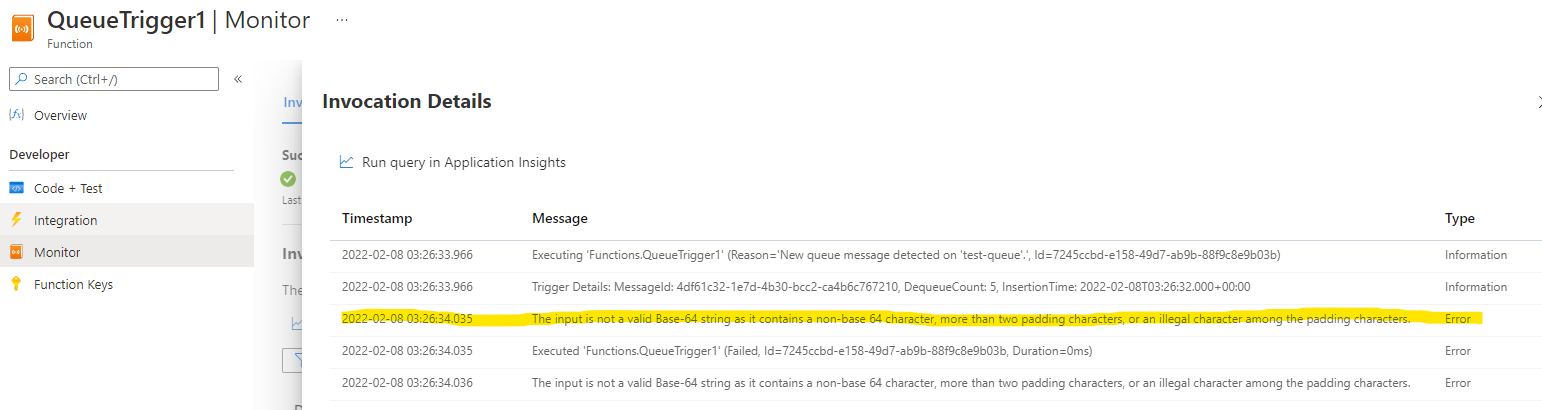
Recall that when you were watching the metrics for your Function App that each message failed to process.
It appears that function apps need their messages encoded in base 64 in order to read them appropriately. I was adding messages to my queue in plain-text wrapped with XML. If I look at the error logs for the function I can see that the messages weren’t formatted correctly:
If you’re going to be working with queues and Azure functions, you will need to look up how to properly encode the messages in your application.
The Poison Queue #
When we were looking at our queue processing messages, you might have seen that your queue was duplicated with ‘-poison’ appended to the name. This poison queue is automatically created to store any messages that your workers failed to process. This is something to be aware of so you can monitor and follow up with message failures.
Conclusion #
This guide didn’t go into too much depth but was illustrative enough for me as I was exploring the queue functionality. I don’t think I would have the message volume in the application I’m building to warrant using queues. Because of that, I didn’t bother going further into troubleshooting some of the message encoding or additional functionality I could get out of the backend function app.
Feel free to contact me on twitter @ZabinskiTech if you have any questions or comments, I’d love to hear from you.